Overview of Stock Input
You can input stock directly from an invoice, or from a pending purchase order. There are two screens displayed used for this task. Specific directions can be found later on this page.
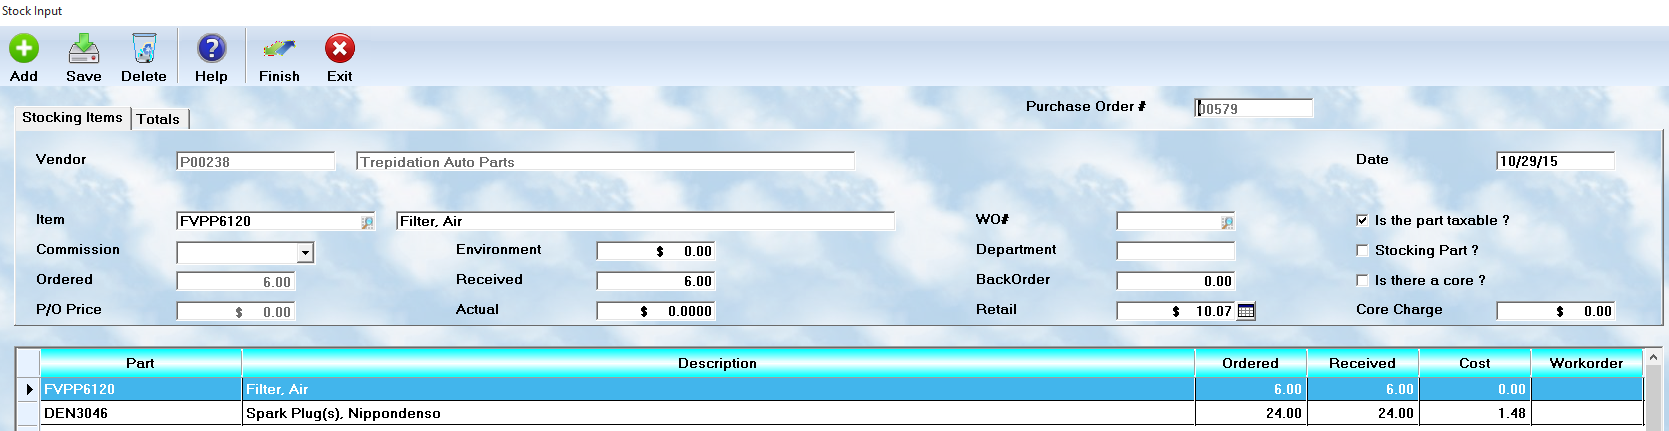
This is the first tab, called Stocking Items, and it is used to verify parts received, and to add new items. Once the PO is selected from an available list, or the vendor is selected from the search control if there is no PO, this screen will display. All items already on the order will be displayed. Here are important notes about this screen. Highlight an item, and enter the Received quantity. If you ordered 20, and 10 arrived, then the system will put 10 on Back Order. However, if you cancelled the balance, simply change the value to 0 then
verify the Actual price paid for each item. You should enter the correct Retail price in the specified field. This is a quick way to keep it current, and the value will automatically change in Inventory.
You may add additional parts to this input screen, even if they were not on the PO but came in the same shipment.
When all items are completed, then select the Totals tab.

All values should be entered in by default except
• Shipping Charges - These would be levied by the vendor and itemized on the invoice
• Prepaid Tax - Some government entities charge a pre-tax which would be entered here.
• Invoice # - This is the invoice received with the shipment.
When everything is complete on this Purchase Order, you may press the Exit button.
You may revisit a purchase order several times. For example, the first shipment leaves many items on backourder. When those items arrive, simply do a stock input for that PO again. Only the outstanding items will show up, and they are processed in the same way.
As you receive parts that you order, you may input them into the inventory very easily. You could use the editor to adjust the counts, and average cost, but this would be time consuming, and laborious. To save time and handle parts purchases easily, select Stock Input from the Inventory Menu.
Parts on a Purchase Order
When you select the Stock Input option, you will first be asked if the received parts are on a purchase order. If so, you will be asked to enter the PO number, or you can press the right mouse button for a lookup list. Once the number has been entered / selected, the system will list all parts on the purchase order.
Parts not on a Purchase Order
You may also enter parts not on a purchase order. If you select this option when asked about the purchase order, you will see the data screen displayed with no information provided. You can then fill in the information as detailed below.
The Stock Input display
The Stock Input window has two display tabs. The left one shows the parts listing browse window ( lower half ), and the detail for the highlighted part ( upper half ). The right tab shows the totals screen. You may freely switch between these two screens as you work on the stock that was received.
The control buttons
These buttons control the actions on this window:
•![]() - select this button, after each part record is added or modified, to save your work
- select this button, after each part record is added or modified, to save your work
•![]() - select this button to add a new part to the list
- select this button to add a new part to the list
•![]() - select this button to delete the highlighted part from the list
- select this button to delete the highlighted part from the list
•![]() - use this button only when your work is complete, and you wish to process the entries
- use this button only when your work is complete, and you wish to process the entries
The parts data
The following information is to be provided for each item in the stock input listing.
• Vendor - In the first field, enter the vendor's Disbursement account number, and the system will supply the vendor's company name in the right field.
• Date - The system provides todays date by default, but you may edit this to a different date.
• Item - The partnumber is displayed in the left field, and a description is displayed in the right field. If the items are displayed from a purchase order, this information is already on file. If a new item is added, when the partnumber is added, the system will seek a description from the inventory file of stocking, and non-stocking, parts. If none is found, then the description will have to be typed in manually.
• Job - If the part is to be added directly to a work in progress, enter the workorder number in this field. If the item is to be stocked in inventory, this field remains blank.
• Taxable ? - Check this box if the part is taxable
• Core ? - Check this box if the part has a core
• Core charge - Enter the cost of the core, if appropriate, in this field
• Commission - If the part is to be placed on an invoice, and an employee is to be paid a commission, enter the employee code in this field.
• Environment - If there is an environmental ( hazardous waste disposal ) fee associated with this part, enter the amount here. The figure used should be the fee for each individual part, even if you have more than one being entered.
• Department - If the part is to be placed on a workorder, and charged to a specific department, place the code in this field.
• Ordered - If the item was on a purchase order, the number ordered will be displayed here. If you are revisiting a purchase order, this number will reflect the amount still on backorder
• Received - Enter the actual quantity of this part which was received. By default, the system will place the number still on order in this field.
• Backorder - If the number received is less than the number on order, the system will display the difference as "backordered". If you do not intend to accept any backordered parts, change the quantity in this field to 0.
• P/O price - The system will display the price shown on the purchase order, or the last price actually paid for this part.
• Actual - Enter the amount which was actually charged by the vendor for this part. By default the system will display the same value as shown in the P/O price field.
• Retail - The system will show the current retail price for this part if it is in the inventory list. If the retail has changed, enter the new value in this field.
The totals data
The following items are the totals for the stock you have input on this account. The system will calculate the totals for parts and core, but you will need to post the shipping charges, any pre-paid tax that was levied, and the vendor's invoice #.
• Total parts - The system will calculate the total for all parts and show the value here. If the value is incorrect, you adjust it by correcting the individual items rather than adjusting this number.
• Total core - The system will calculate the total for all cores received and show the value here.
• Vendor's subtotal - The system will calculate the subtotal of parts and cores and show the value here.
• Shipping - If the invoice includes a shipping charge, enter the amount here.
• Pre-paid tax - If the invoice includes a pre-paid tax assessment, enter the amount here.
• Invoice # - Enter the vendor's invoice number for these parts in this field
• Vendor's Total - The system will total the charges you have entered, and that are calculated automatically, and display the value here.
The following items are for the General Ledger account numbers used in each category supplied.
• DEBIT Inventory - Parts that are to be stocked in inventory should have a debit account in the Assets category.
• DEBIT Expense - Parts being applied directly to workorders should be immediately expensed. This account will usually be the cost of parts account number.
• Credit - Generally you will credit the total to Accounts Payable. However, you may have arrangements for alternative payment methods handled from a different account.
• Shipping account - This is the expense account in the General Ledger for all shipping charges.
• Tax account - If you have a prepaid tax requirement ( ie. Canada ), then you would enter the GL account number here.
If you make any additions or changes to this data, you must select the Save button to save your work. Do not make any changes to the Total parts and Total core. If changes are necessary, adjust the values on the parts data screen.
Processing
When you select the Exit button, the system will process all of the data. Parts will be applied to inventory and/or workorders as appropriate. The charges will be posted to the Accounts Payable, and appropriate totals will be posted to the General Ledger.
When the processing is completed, the system will ask if you wish to print labels and/or a summary report.
Backordered Parts / Revisiting the Purchase Order
If items were left on backorder, the purchase order will remain open. You can re-enter the stock input section at a later time, and recall the purchase order. Only those items which were left on backorder will be displayed, and processing would continue as normal.
The Summary Report
The summary report provides a listing of all parts input in this processing round. Some business owners find it useful as an auditing tool.
Printing labels
The system will ask if you wish to print labels. If you answer Yes, then the system will display a list of the parts and the quantity of labels. You change the count on any/all items to be the exact number of labels you want. ( You may have 500 bolts, but only want one label for a container, but label for each of the 3 oil filters you receive.) These can then be placed on the parts for quick reference at a later time. Once you specify the number, the system will ask you for the starting line. Since you are using sheets of labels, if some have already been printed, count down the number of used lines to the one you want to start on, and enter it. ( For example, if you already used 3 lines, you want to start on line 4 ). This method saves you from wasting labels.
Many people use a "double backed" label. This allows them to place the label on the part package, then remove it and place it on the back of the shop's copy of the worksheet. This allows for double checking the invoice to be sure all parts are billed.