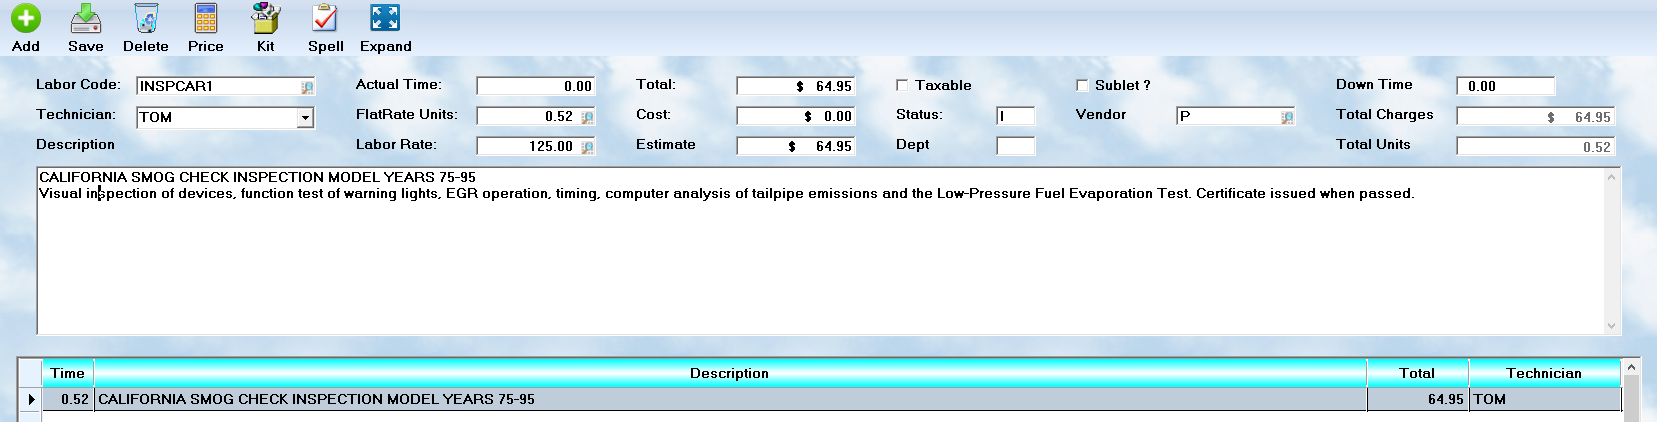
Labor descriptions are a critical element of any workorder/invoice because it is your opportunity to convey to the customer a clear description of the actual services rendered. This will enhance your client's view of your professionalism as a service center, and will eliminate any confusion or questions in the future. Labor entries are input on the screen below.
Here are some specific guidelines for getting started.
Adding a labor item
![]() To enter a new labor item you must first press the button. If you do not, then you are not actually writing your data to a record, but rather to memory space that will be erased once you move to another record.
To enter a new labor item you must first press the button. If you do not, then you are not actually writing your data to a record, but rather to memory space that will be erased once you move to another record.
Labor descriptions are tied, in a "glossary" system, to a specific code. Please read the Glossary Concepts to understand how this is designed. If you know the code, you may type it in directly. Otherwise, click on the ![]() icon to begin a search. If you want to type in text that is not saved in the system, use the code B for blank lines. When you complete the entry, you will be asked if you want to save this new entry to the glossary. Enter No. If you fail to make this choice, a B code will always bring up the same text !
icon to begin a search. If you want to type in text that is not saved in the system, use the code B for blank lines. When you complete the entry, you will be asked if you want to save this new entry to the glossary. Enter No. If you fail to make this choice, a B code will always bring up the same text !
![]() When you have completed an entry, please remember to press the button or your data cannot be retained.
When you have completed an entry, please remember to press the button or your data cannot be retained.
![]() You can delete an existing entry and all tracked data will be automatically reversed where it has been placed.
You can delete an existing entry and all tracked data will be automatically reversed where it has been placed.
Price Level
![]() Clients are charged for services based on their price level. Some companies only have one, retail, for everything they do. The ASW 8 system allows five levels, Retail, and levels 1 to 4 for wholesale/discount. You can change the price level for a single entry, or for the entire workorder, with the button. Once you set a level, it will remain there until you reset it to a different level.
Clients are charged for services based on their price level. Some companies only have one, retail, for everything they do. The ASW 8 system allows five levels, Retail, and levels 1 to 4 for wholesale/discount. You can change the price level for a single entry, or for the entire workorder, with the button. Once you set a level, it will remain there until you reset it to a different level.
Building Kits
![]() Although you can build kits manually within the glossary system, the button activates an automatic kitbuilder. The process works with the highlighted labor item which it puts into a kit ( you specify the code ), and then you are shown the parts on the workorder, and you will check off those that should be in the kit. The resulting code will then be available to use on future services.
Although you can build kits manually within the glossary system, the button activates an automatic kitbuilder. The process works with the highlighted labor item which it puts into a kit ( you specify the code ), and then you are shown the parts on the workorder, and you will check off those that should be in the kit. The resulting code will then be available to use on future services.
Labor Entries
Your customers should know exactly what services you have performed on their vehicle. You communicate this with the labor entries. Using the glossary codes will greatly speed your entry of data, and provide for uniformity in your work. You may enter an existing Glossary Code, have blank lines to write a unique description, or even write a new glossary for this workorder, and save it to your main glossary file.
Glossary code entries
To use a Glossary entry, type in the appropriate code. This is a lookup field. Consequently, if you do not know the code, right click the mouse when pointing at the code field. The computer will then display a list of service "systems" (See Glossary instructions for more detail ). Move the highlight bar to the desired system, and press Enter, or point at it and double click the left mouse button. The computer will then display service "groups". After highlighting, and selecting, the desired group, the computer will display the services available for the group. Select the desired listing from the list, and the actual glossary entry will be read into the current workorder.
The logic of this structure is very consistent, and the codes will be quickly memorized. If an incorrect code is entered, the system will display a scrollable list of all entries. Therefore, memorizing the codes will be safe.
Non-glossary entries
If you wish to enter a description which is not in the glossary, enter a letter that is not in the file, ie. B (for blank lines). The computer will ask if the operator wishes to use blank lines. If you wish to type in new information, select YES. The computer will then open all fields in edit mode, and you may complete the data entry with the following information.
The Labor Chart Display
A charting system has been developed which automatically tracks totals for all glossary service codes specific to year, make,
and model of the serviced unit. The system is fully automatic. When you enter a service code on a workorder, if there is a match, the system will display the high, low, and average units, and charges, for that work. It is specific to the unit type for which you are preparing the workorder.
The chart is generated in the Client section, and updated as workorders are closed.
Rates / Totals / Cost
Your system will verify the rate you enter against the list you created in Validation Lists. . You may use the![]() button to look at the list and select one to apply. They system will automatically multiply the Units by the Rate to create a Total. If you want to use actual time for the total, enter it in the Unit field. The cost will be based on the criterion established for the selected technician in Setup - Costing.
button to look at the list and select one to apply. They system will automatically multiply the Units by the Rate to create a Total. If you want to use actual time for the total, enter it in the Unit field. The cost will be based on the criterion established for the selected technician in Setup - Costing.
Timing
There are two fields for time, Actual and Units. The first refers to clock hours, and must be used if you have set the technician for calculating Job Costing based on actual time. Units refers to flat rate, or book time. Glossary codes often have the flat rates included, and a value would be transferred to this field once the code is entered. The ![]() next to the field will activate a labor time lookup capability. Several vendors provide labor time guides that interface to ASW 8. You can select the guide you wish to use ( if it is installed ), or you can select the option to obtain times from the Charts maintained by the ASW 8 system. When using a lookup system, the selected values are automatically returned to this field.
next to the field will activate a labor time lookup capability. Several vendors provide labor time guides that interface to ASW 8. You can select the guide you wish to use ( if it is installed ), or you can select the option to obtain times from the Charts maintained by the ASW 8 system. When using a lookup system, the selected values are automatically returned to this field.
The Labor Descriptions
The Auto Shop Writer 2004 has a pre-built set of labor descriptions ( Glossary ). You may eliminate, modify, or add to them according to your own needs. These descriptions have been written with your client in mind. It is critical to provide clear, complete, descriptions of the work you perform. This signals your customers that you are a truly professional operation, and it provides a clear understanding of exactly what services you have performed. Brief descriptions, ie. "R&R Radiator", are ambiguous and often lead to conflict. Abbreviations are trouble waiting to happen !
Technician
Enter the name, or code, of the technician who performed this service. This will be printed on the final invoice, and will be retained in the service history for future reference. If you do not remember the Technician's name, right click the mouse for the lookup list. If an incorrect technician is entered, the system will also trigger the lookup list so that the correct individual may be highlighted, and entered.
While some shops like to use codes for their Technicians, it will be faster when doing a service follow up to use the persons name. If you look at a history, and see the service was performed by Technician 007, you will have to know which person had that code when the work was performed. This is a lot harder than recognizing the name James B. on the display.
** SPECIAL NOTE ** If you leave the technician box empty, when entering a glossary item, and press the Enter key, the whole box will be opened for editing of data.
Actual
The Actual field tracks the actual amount of time which was devoted to this service item. It is compared to the flat rate time ( units ) for efficiency reporting, and may also be used in Job Costing ( see the Technician section under Setup ).
Units
The units represent the normal number of hours used to complete a service. This is in decimal form to handle fractional amounts. Remember, every 6 minutes is .1 hours. You may wish to refer to one of your shop service guides (flat rate books) for the standard times associated with a particular service. You have probably purchased one or more of these for this purpose. You may also wish to enter some of these services into your glossary for later access.
Rate
The system will provide the default hourly service rate your shop charges in this field. This was entered using the SETUP utility when you first installed your system, or may have been modified since that time. To obtain a different rate, enter the amount, or right click the mouse for a list of valid rates and applications.
The rate does not print on the workorder. It will be used to calculate the charge if no value is specified. If you wish to omit a charge, enter a $ 0.00 in this field. The system will then have a charge of $ 0.00 while retaining the time value for reporting.
Total
The charge is the total amount the client will pay for the labor performed. The computer will multiply the units by the rate for an initial total. You may overide the calculated amount by entering a value, as a fixed rate, and the computer will accept the amount.
Cost
The cost field will be automatically calculated based on the rate of pay for technician, and the amount of time ( actual or units ) involved in this service. You could overide the cost field if you are paying a flat fee for the service. This is also the field to enter the amount paid to a vendor if the service was sublet to another company.
Item Estimate
If drawn from the glossary system, this will be the amount estimated for this charge
Tax
The system must know if this is a taxable labor. The Glossary entries will provide a default for this field. If the service is to be taxed, be sure a check mark appears in this box.
Sublet
Some services are handled by sub-contractors. These are known as sublets, and most states require that they be identified separately. The default is Empty for this field because most of your work is not sublet. However, you may check this box when appropriate. Most people will enter the sublet service, and include the total for parts and labor as one entry. This is perfectly acceptable. However, you may itemize parts separately if you wish.
Status
The status flag will tell you if the labor item is currently an Estimate, or Invoice. Items flagged as Estimates will not display on the final invoice. Labor does not appear on a counter sale.
Vendor
Use the appropriate code assigned to the vendor who may have performed this work, if it was not done in the shop, from the Disbursements accounts. You may right click the mouse button to obtain a lookup list of vendors.
Department
If the work is assigned to a department, enter the code here. You may right click the mouse button to obtain a lookup list of departments.
Down Time
When a vehicle ties up an area of service ( ie. a lift ), this time is costly. The third time clock on the main button bar will track the amount of "down time" a service accumulates.
Total Charges
This is the sum of the total charges to this workorder.
Total Units
This is the sum of the flat rate times assigned to this workorder currently.
Viewing The Description
The system will first display the description, in a scrollable box, on the screen. Review the information for appropriateness. You may make changes to the description which will remain specific to this workorder, even if the original description is drawn from a Glossary entry.
Editing the description
Please review the chapter on Glossary writing for examples on writing descriptions. The most important issue here is The Executive Management System invoices should never contain abbreviations. Clear, Concise, Complete Communications with your Client are the 5 Vitamin C's in profit. Don't ever let them be hidden. Review the section in Coverin the Basics in this manual about using the text editor. This will explain procedures for moving, cutting, editing, and adding text. The description is your most important communication with your client. It should be complete, and never abbreviated. Well written descriptions can be the difference between customer trust and fear.
Edit a service
To edit a service, move the highlight bar to the desired entry, and the details will appear in the data box at the top of the screen, and be ready for complete editing. When you are finished making changes, select the OK button.
Saving A New Entry To The Glossary
When you have used the blank line function, and realize that you have written a "classic", it can be saved directly to the Glossary. You will be prompted, in such a case, by the system, and need only answer Yes to have the item transferred. The system does not transfer pricing information. You will also be asked for a code. Be sure to assign one that meets the standards assigned to your Glossary Setup.