The following functions are all performed by selecting Inventory from the main menu, and then by selecting the Inventory Editor option.

Entering New Stock
Entering new parts to inventory is as simple as selecting the Add button on the bottom of the Inventory Editor window, entering your information, and saving it by pressing the Save button.
You may start, and stop, this process at any time. There will be no problem adding more parts at a new work session. You will also use this method whenever you add new stocking items. This will occur frequently, especially when you begin reviewing your Parts Utilized Report.
Editing Stock
When changes need to be made to your stock records, simply find the part, make the changes on the screen, and select the Save button.
Inventory Information
The inventory data is all maintained on the record screen displayed for each individual part. The following are the descriptions of the displayed fields.
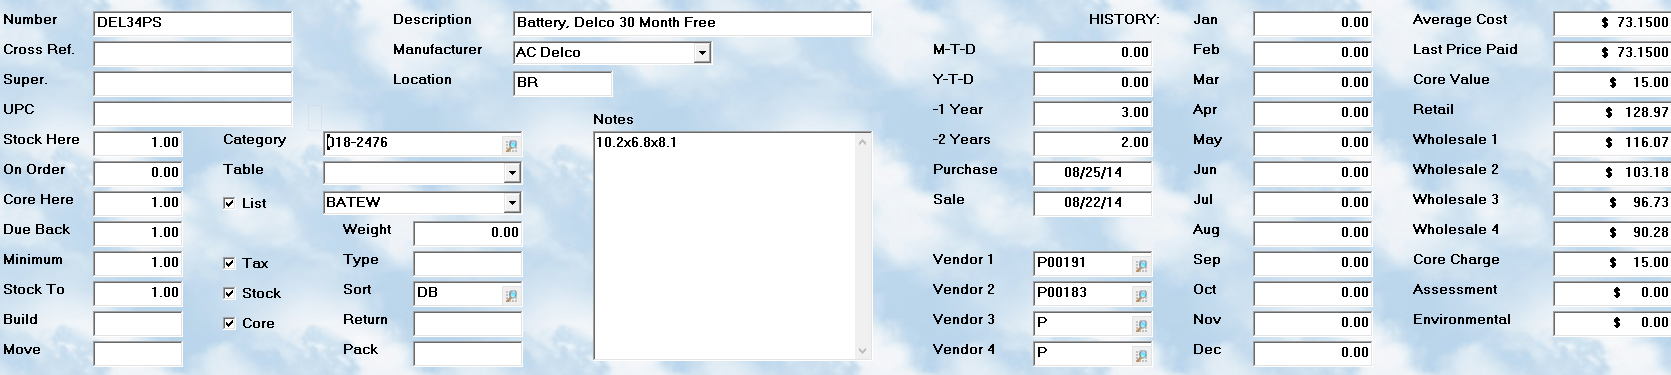
• Number: Enter the manufacturers part number
• Description: Provide a precise description of this part. Be sure to be uniform on your descriptions so that all parts of the same type will be listed together.
• Manufacturer: Enter the name of the manufacturer of this part
• Cross Reference: Review the Cross Reference discussion and enter a number if appropriate.
• Super: If the part has been superceeded by a new partnumber, enter the new number in this space. Be sure to create a new record for the new part number.
• UPC: The universal product code assigned to the part
• Loc/Sort: Enter a proper location code.
• Build: Select New, Remanufactured, Factory 2nd, or Used.
• Move: This reflects the vendors code for expected movement timing of this part
• Weight: If you provide shipping of parts, enter the weight of the item plus its shipping container.
• Type Code: You may enter a special sorting code of your choice to be used when creating special queries and reports
• Sort: The sort code of your choosing is for grouping similar parts. You may wish to use the down arrow key to check available sort codes.
• Return: This notes if the vendor will accept a return of this part
• Pack: This provides the quantity per package
• Stock Here: When first adding a part to inventory, you will want to enter the current stock. Thereafter, or if you use Stock Input to enter a new part, the system will automatically track this amount.
• On Order: The system keeps track of the quantity of a part on purchase orders.
• Core Here: This is the number of cores currently in your possession which need to be shipped back to the manufacturer.
• Due Back: This is the number of cores clients have not yet returned.
• Minimum: Enter the minimum quantity to be in stock, below which you reorder this part.
• Stock To: Enter the quantity you wish to stock to when reordering this part.
• Category: Automotive industry standard codes are provide for the part type. A selection box is provided for looking up the proper code.
• Tax: Check this field if the item is normally taxable
• Price Table: Enter a Price Table code for this part if you have one already built.
• Stock: Check this box if the part is normally stocked in your inventory. Leave it blank to track special order items.
• Core: Check this field if the item has a core
• Kit: If you wish to automatically add parts from a Parts Pick List that you have developed, check off the first box, and put the Pick List code in the second box.
• Vendor 1-4: Enter the Disbursement account number for any vendors from whom you purchase this product.
• MTD / YTD / Month totals: The system tracks all month to date, year to date, and individual monthly totals of sales.
• -1 Year / -2 Years: When closing a year, the system will take the totals and place them in the -1 ( last year's) column, and move that figure to the year before ( -2 ).
• Date of last purchase: When ever new parts are purchased, this field is automatically updated.
• Date of last sale: Whenever this part is sold, the system updates this field
• Sales Totals: Sales totals are automatically tracked each month.
• Average Cost: The system calculates the average cost based on current quantites and value, plus the cost of new stock purchased. It is very important that the Average Cost field not be adjusted manually unless it is the very first time a part is being added to inventory. This amount reflects the true value of your inventory. By changing the price, you records will become inaccurate and you may endure tax consequences. The system will handle this value appropriately during any receipt of new parts when entered through the Stock Input routine.
• Last Price Paid: Whenever an item is purchased, the current price is entered into this field.
• Core value: This price is provided when stock with cores is input, and it is maintained by the Stock Input routine.
• Retail: Enter the retail price that will be charged for this item.
• Price level 2-5: Enter the discount prices you wish to charge for this item. Note: You can press the space bar for a calculator to figure the price.
• Core charge: Enter the amount you intend to charge for a core that is not returned, or damaged.
• Assessment: Enter the amount you need to charge for special taxes, ie. F.E.T., on this item
• Environmental: Enter the amount you charge to cover hazardous waste disposal or special assessments on this item.
•Notes: This section is for any notes you wish to save on this part. You can use the Expand option to have a full screen view of the notes, and to make changes.
Saving the Information
To save the information you have entered, you must select the Save key. Failure to do this will result in all of your entry on that record being lost. No other key will provide you with a saving capability.
Searching for a Part
The Auto Shop Writer provides a search option button. The popup screen will let you select from a range of search options, which include all parts in the system, or limiting your search to either stocking parts, or non-stocking parts.
First you must select the radio button which is in front of the type of search you wish to perform. Then click on the OK button and start typing the beginning information based on the type of search you selected. You will automatically see the list jump to the proper location in the database.
Moving through the inventory list
You will see a browse box at the bottom of the Inventory Editor screen. The highlighted part has its full information displayed in the upper part of the screen. As you browse through the list, you will see the information in the data fields above change to match the highlighted part.
You may move through the list by using the Page Up, or Page Down keys, the arrow keys, or by selecting the up and down arrows with your mouse cursor ( arrow) and pressing the left mouse key. You may move more quickly by taking the bar in the scrollbar on the right side of the browse box, and moving that bar either up or down.
Price Calculation
You can automatically recalculate the prices you charge for an item, if you have set up and specified a Price Table. By selecting the Price Calc button, your computer will apply the appropriate price table to the current cost, and display the new prices in the proper fields. This will not work if no price table is specified.
Deleting Parts
You may delete parts by selecting the Delete button at the bottom of the window. You will be asked to confirm that you want to delete the item. It is generally unwise to delete items since they contain your sales history, and pricing data. It takes very little space to store a record for a part and this information can be valuable. Never delete a part when you have items in stock, or on order.
Exiting the Editor
To Exit from the Inventory Editor, please use the Close button on the right bottom side of the window. This button triggers the appropriate operations which save your data and close the inventory files.